
Arcserve RHA (Replication & High Availability) is one of the core products within the Arcserve suite. At a glance, the Arceserve solution is made up of 3 key components:
- Arcserve Backup – Tape Backups
- Arcserve UDP / D2D – Disk to Disk
- Arcserve RHA – Replication & High Availability
Having years of experience operating & integrating a range of backup solutions including Commvault, TSM, Symantec & Storagecraft, I’m no stranger to the trials, tribulations, pain points and chores of the ‘backup guy’. With all that in mind, I have found Arcserve to be a simple and robust solution that’s fit for the enterprise.
I must say at this point, if you have not used Arcserve in many years and happen to be in the market for a new backup / HA solution, it’s worth a review as a lot has changed. I mention this as some of my clients who are now in love with the product didn’t have the fondest of memories from back in the day when its was part of Computer Associates.
In this this article, I will highlight a couple of a challenges I recently came up against with RHA, particularly the failback process (Reverse Scenario). These potential challenges are subject to environment variables that could affect many implementations of the solution and only really come to light in a failback scenario. I thought it would be good to share this experience with the findings and resolutions so that other engineers can consider this at build time and quickly rectify the issues when a failback is required whether it be test or the real deal.
Environment Overview:
- Replication of 25 business critical servers from Head Office to Co-location
- Connected via 1Gb dark fibre
- Single backup (UDP/RHA) virtualized host with directly attached storage array (Data Centre / Colo)

I have weekly automated testing in place using RHA ‘Assured Recovery’. This boots the replicated VM’s to confirm they start without issue, I also configured a private network so that further testing at the application layer could be carried out manually on a regular basis. This process is none disruptive as the production servers remain online and are unaffected. Detailed, inbuilt reporting provides and an insight to the protected servers and confirms that they would, or would not correctly failover over in a production incident. In this case the reports and regular manual testing were solid. Happy days… It’s also worth noting we successfully completed some live testing (failover & failback) using non critical VM’s during the implementation and test phase.
The Problem:
Following a storage failure in head office (Primary Data Centre), I was forced to initiate a failover of the affected VM’s residing on the failed LUN. This included a few Citrix Xenapp Application servers and Microsoft Exchange. The failover worked as expected, all affected services were online and fully operational within 15 minutes. Well within the 1 hour SLA.
Once I confirmed that all of the affected VM’s were running and stable on Colo infrastructure I got the primary storage issue resolved. This took a day or so but when the LUN was reprovisoned I was ready to failback. This is when some problems started to arise. The smaller VM’s, that being Xenapp Application servers were in sync using RHA and ready to failback within 4 hours, this was 6 servers with 80GB OS volumes. However, Exchange was taking much longer to sync, it was a bigger VM but something wasn’t adding up. There was around 500 mailboxes on the server with a total size of around 1TB. Baring in mind that the link back to the production system was 1Gb fibre, I would have expected the resync to complete within around 4 hours. Technically speaking, it’s possible to push 1TB over a 1Gb link in 124 minutes but I was making allowances for the other RHA and UDP traffic which would be consuming a fair bit.
After taking a closer look at the Exchange RHA scenario I noted that it was only getting 3MBps throughput on the resync. This was destined to fail as the recovery process uses a BMR boot image that leverages WinPE. If you are unaware, WinPE has a 72 hour limit before initiating a compulsary reboot. If I let the scenario continue it would take 89 hours to resync meaning it would be unable to complete due to the interruption of the forced WinPE reboot. This posed a problem, even if I manage to resolve the throughput issue for this particular incident, I have other servers in the environment hosting seismic data that are up to 25 TB in size.
In the next section I’ll show how to resolve both issues, those being;
- RHA Resync / throughput issue
- WinPE 72 hour reboot issue
Solution
RHA Resync / throughput issue
After restarting the RHA scenario a handful of times I found the poor throughput persisted, I had a dig through the logs to find some references to the RHA autotune function which detects the quality of the LAN/WAN link based on a PING check / RTT delay. Anything below 50Ms is considered to be on a LAN / high performing network, anything above 50Ms is deemed to be a WAN link. There is also a default TCP SendRecieve Window size of 256K, this is not auto-sized by the application but it can be manually set to improve performance. This is the TCP chunk size of the buffer on the sending side, the data will be buffered until the receiving side returns an acknowledgement.
In this case the link was considered poor due to the high latency and poor bandwidth measurements. The link was still being utilised for incremental disk backups and replication traffic. I revisited the logs and confirmed that each of the autotune calculations were initiated at a time where there was a lot going on which was the cause of the skewed estimates.
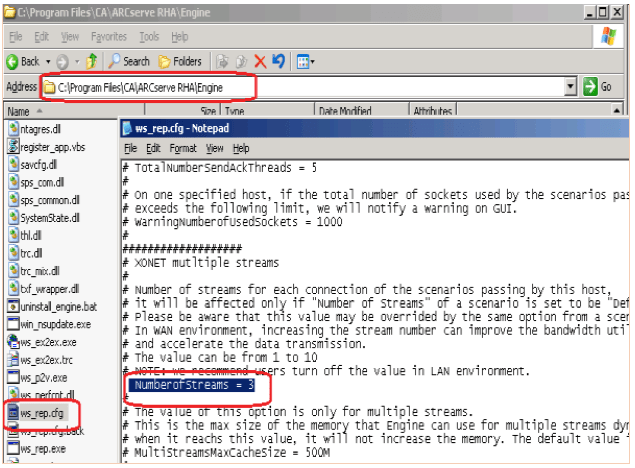
To remedy this I manually set the TCP chunk size to 512k and decreased the TCP streams to 1. This can be done on the following configuration page and configuration file:
Edit Number of streams:

Edit TCP buffer size:
WinPE 72 hour reboot issue
This issue can be resolved by running the Sysinternals command line utility ‘PSSuspend.exe’ from inside Windows PE on the VM / Physical machine you are attempting to recover.
NOTE: I originally created all of my BMR ISO’s in 64bit, for the following process to work and for ‘PSSuspend.exe’ to successfully run you must use a 32bit BMR ISO. If you only have 64 bit you will need to create a 32bit version using the Windows Automated Installation Kit (WAIK).
Here are the steps:
- Pull down a copy of ‘PSSuspend.exe’ from Technet (https://technet.microsoft.com/en-us/sysinternals/bb897540.aspx)
- If you are recovering a physical machine, copy the ‘PSSuspend.exe’ image to a USB drive. If you are recovering a VM and your Hypervisor platform/version doesn’t allow USB passthrough you can try attaching a floppy disk drive and copy the ‘PSSuspend.exe’ to there.
- Start the command line within WinPE by choosing ‘Utilities’ then ‘Run’:
- In the Run dialog box, type CMD and hit Enter or click OK
- In the Command Line Window navigate to the drive/directory where you have ‘PSSuspend.exe’
- Run command “pssuspend.exe winlogon.exe”
This will prevent automatic WinPE reboot and allow recovery of a full-system that exceeds a duration of 72 hours. If you have any issues executing the command with errors relating to image type confirm you have booted the physical or virtual machine using the 32bit BMR ISO.
NOTE: The BMR window will continue to count down to zero but no reboot will occur.
Summary and Recommendations
This incident proved to be pretty costly on time and stress levels. Sure, the solution worked and the affected applications (Citrix Xenapp and Exchange) were operational within 15 minutes of a serious failure. However, there was noticeable performance degradation due to the DR infrastructure being inferior to that of the primary (Budget constraints) so it was imperative to get the VM’s back on to the primary kit asap. Unfortunately this took way to long. If you are running this solution, or planning to, include the following tasks and testing to your plan during build and production with regular testing:
- Ensure you have 32bit BMR’s for all products (Arcserve Backup, UDP & RHA)
- Download and test the ‘PSsuspend.exe’ utility in your environment for physical and virtual workloads
- Consider the re-sync time for every protected server both physical and virtual in the poorest possible network conditions with regard to jitter, latency and bandwidth
- Manually configure the TCP buffer and TCP stream count on your scenarios based on testing from the smallest to largest servers. Do not leave it to ‘autotune’… she bites…

Leave a comment